

PackAI 2.0.x
The barcodes are helping the packing operators during the part allocation process in the packing area. When logging in the terminal, you can either type or scan the barcode of a part to visualize the complete package and the current part position in the package on the terminal. Each part has a unique barcode, but depending on the customer requirements the barcodes vary in length, type and format. Therefore, each user needs to do an initial setup of the barcodes before scanning them.
The following article explains the settings in detail, we have split the article in two sections.
- Files - when scanning files, the Terminals are not working with a barcode scanner, they expect a text file with the barcode to be generated in a specific folder and constantly search for new files. When the file is generated, PackAI reads the code and deletes the file, simulating a barcode scan. This method is suitable for sorting cells automatically feeding the packing operators and generating the file during outfeed of the first part to the packing operators. In this case the part is automatically loaded on the terminal and the operator does not need to select any codes or do manual scans.
- Scanner - the scanner mode is the default mode, where a barcode reader needs to be connected to the packing terminal, when the packing operator scans the part barcode, the part will be loaded on the screen. Use this mode also when typing the code from a keyboard on the packing terminal, in case you don't have a barcode scanner.
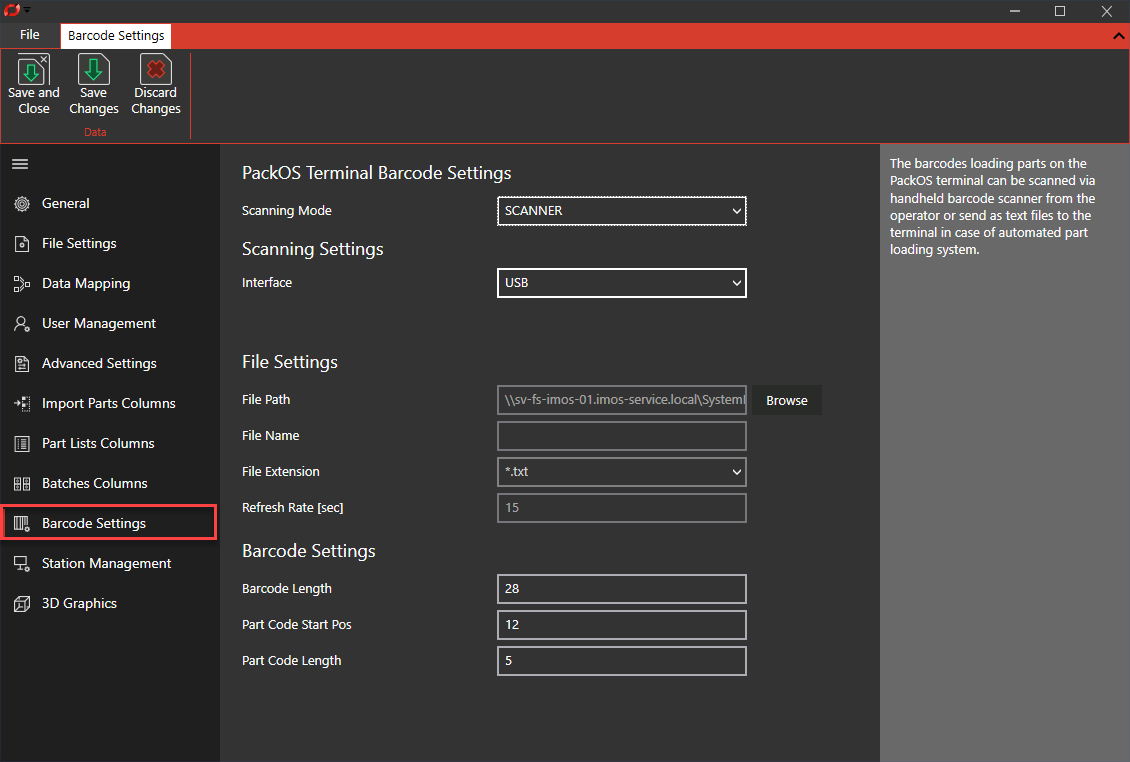
Barcode Settings
The barcode settings are general no matter of the scanning mode, they need to be properly setup. These settings define the range of data to be processed when scanning or reading a string. In case of a barcode scanner you are scanning a barcode, which might be a combination of many strings and the part code can be one of them. The barcode file can also be a complex code, where we only need to read part of it.
Therefore a setup is required for every user.
- Barcode Length - the length of the complete code you are reading. When scanning codes, the barcode might be damaged and the scanning process can only generate part of the code. The current parameter is checking the length and if the value added does not match the code length, we are not going to accept the provided code as valid.
- Part Code Start Pos - starting position of the part code. In case of a more complex combination of strings in the barcode, you need to provide from which character starts the part code.
- Part Code Length - the value represents the part barcode length. In case of a more complex combination of strings, you are defining the complete barcode length, the start position of your part code and the length of your part code in count of characters.
Example
The following barcode is combination of ERP code, PART code and MES code, each code is being processed individually by each system. In our case we are reading the code in the PART section or 25511, all the other characters are irrelevant for PackAI.
The proper settings for this example are:
- Barcode Length - 28
- Part Code Start Pos - 12
- Part Code Length - 5
The Barcode Settings are located under the File menu, Settings and then Barcode Settings.
Note: Keep in mind that the setup is user based and needs to be repeated for each user using the software.